PINBALL - BOUNCING BALL COURSE
2. SETTING UP YOUR PINBALL COURSE AND DRAWING YOUR PATH / ROUGH ANIMATION
3. FINAL ANIMATION - CLEAN-UP AND PAINT
4. IMPORTING ASSETS - GLOW MODULES & ANIMATED SPINNERS
5. ADDING AUDIO TO PROJECT IN PREMIERE
- BUILDING A PROJECT FILE STRUCTURE
For our first animation assignment this semester we will be animating a ball through a simple pinball course. This is a great exercise in some of the basic principles of animation and a fun way to put these principles into action. It's also a pretty good way to start getting to know your way around Toon Boom Harmony.
1. PLANNING PINBALL COURSE
To begin you should click on the image below and then download it. From there you can load it into Photoshop or print it out to begin drawing over it.
Your goal is to draw a path for your pinball to travel from the far right of the frame to the lower left and hit as many of the point targets as you can on the way. There's one more thing. . . You need to plan your bounces and your arcs in the most believable way possible. To do this you can move or rotate any of the yellow half-circle kettle drums. Once you feel confident with the arcs and angles that your pinball will be traveling, your next step will be to place some hatch marks on the path to indicate timing. The closer together your hatch marks are, the slower the action.
_________________________________________________________
BALL BOUNCE - EXERCISE
Before we start animating our pinball course, let's take a minute to review some basics and get a chance to warm up to Toon Boom Harmony. If you haven't completed the How to Create and Setup your Project tutorial, now would be a good time to do that.
Research: Take a few minutes to watch how balls actually bounce by searching "Bouncing Ball Reference" on Youtube. After deciding on a particular ball you would like to animate, click on the following link and follow the instructions for "Animating a Basketball". Modify the animation towards the ball of your choosing.
Drawing a Bouncing Basket Ball and Bowling Ball
If you get lost feel free to re-watch the class demo on the 220 class Demo PageWhen you're finished post your movies to the discord channel #bouncing-ball and see if other students can identify what kind of ball you animated.
_________________________________________________________
2. SETTING UP YOUR PINBALL COURSE AND DRAWING YOUR PATH / ROUGH ANIMATION
The first thing you'll want to to do is to download this Zipped Harmony file ( pinBall_BB_build.zip ), open it up and begin exploring your interface.
Next, you begin arranging the drum elements (by translating or rotating) so you can begin drawing a path that reflects the plan you drew up the other day.
Draw your rough animation according to the path you have drawn.
If you like what you see in playback, export a movie and post it to the Discord #pinball-course channel.
If you need help you can review the class demo video here.
3. FINAL ANIMATION - CLEAN-UP AND PAINT
Add a new drawing layer and, draw over the rough animation drawings using Onion Skin to help keep your pinball "on model" (ie. maintain consistent volume, shape and size). Be sure you are drawing on the "L" art layer.
Add any Inbetweens if necessary.
Transfer strokes to the "C" art layer with the "Create Color Art from Line Art" tool, choose a color from the color palette and paint your pinball.
If you like what you see in playback, export a movie and post it to the Discord #pinball-course channel.
If you need help you can review the class demo video here.
_________________________________________________________
BUILDING A PROJECT FILE STRUCTURE
Before moving forward to the "Importing Assets" step you will need to make sure your Harmony scene is part of a larger "Project File Structure".
Begin by saving and closing out of your exiting Harmony scene.
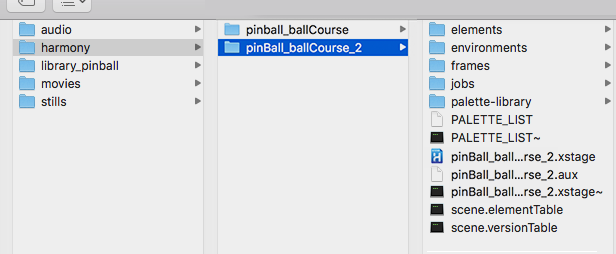
In Finder create the following folder structure for your project.
3. Next move your existing Harmony scene inside the "harmony" folder you created. This will allow for saving back-ups and possible variations of your Harmony project.
Notice that Harmony builds and entire network of folders and assets under a single folder when you create a scene.
4. Reopen your Harmony project by clicking on the .xstage file inside the Harmony scene folder.
5. Next create a Back-up Scene of your existing Harmony Scene by going to File/Save As. . . in the top menu in Harmony and add a "_2" to you scene name. Be careful to put your new scene in the "harmony" folder and NOT INSIDE YOUR ORIFINAL SCENE FOLDER.
_________________________________________________________
4. IMPORTING ASSETS - GLOW MODULES & ANIMATED SPINNERS
Download pinBall_glow_spin.zip and watch the demo video on how to do the following:
- Save pinBall_glow_spin.zip to your ToonBoom Library Folder and Extract .zop file.
- Import assets from your ToonBoom Library folder into your Timeline
- Set Animate mode to "Off" and use the traslate tool to place them in your Camera View.
Turn the Animate mode "On" and set motion keys to Animate spinners.
- Switch on Render View. In the Timeline Layers panel, use the Function Editor view to set stop-motion keys to "0" and "1" to switch on and off glow nodes.
- Export a movie to preview glow animation in time. Make changes, save and re-export. If you like what you see, name the movie and post it to the Discord #pinball-course channel.
Movie File Name: simpsonB_pinball_glow.mp4
5. ADDING AUDIO TO PROJECT IN PREMIERE
Download audio effects from FreeSound.org, edit edit your effects in Adobe Audition, and add them to your movie in Adobe Premiere.
Here's the class demo on downloading and editing sound in Audition. If you are unfamiliar with Premiere read this quickstart guide tutorial on adding sound in Adobe Premiere.
6. FINAL PROJECT SUBMISSION
Zip your Entire Project File Structure, Rename and upload to Basecamp: 220 Animation Drawing 1/220 Dropbox/Pinball Course
Zipped Project File Name: simpsonB_pinball.zip
Stephan Leeper - Central Michigan University 2021